Hi everyone, OK so a lot of you have commented on my makeup (thank you very much) and sometimes its kinda hard to explain in which order to do stuff and i always get asked what cosmetics i own and like.
So this page is my first (i say first cos if it prooves popular then i may do more) attempt at guiding you through a quick lesson in applying makeup.
This should take you about 20 minutes or so to complete.

What i normally do is just also check for straggly brow hairs and blotches or spots at this point, use concealer if you need to, I use a little concealer stick slightly lighter than my normal foundation.
As you probably know i use MAC cosmetics for most of my makeup but as im going for a daytime look here im gonna have to use some more "normal" shades and i dont have these in MAC but its whatever works for you, you dont have to use exactly what i do.

So push your hair out the way with a wide hairband or bobble. Now apply foundation evenly, i find it is a better finish by using sponges rather than my fingers. I also suggest applying foundation in layers, this is probably the most time consuming part of applying makeup for me. If you slap it all on and its the same finish all over it wont look right.
As you can see im using MAC full coverage foundation, it is suited to my skin tone i went to a MAC counter and a girl tested a couple on my cheek and this was perfect however it is pretty expensive at £20 for this little pot.


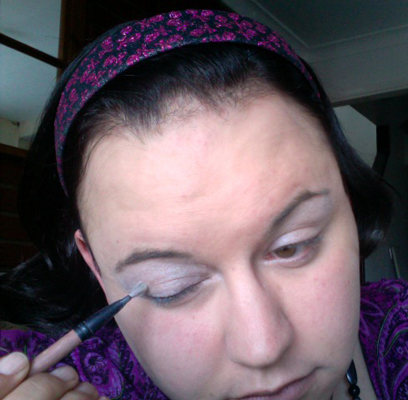


Onto the eyes - This is where it starts to get fun. The 3 pics above show an important starting point for good even eye makeup. All it is is a very light (almost white) powder, you could also use cream if you have it but mine is a little pot of MAC white powder. I brush it on my upper lid and then work my way all the way upto my browline.
Pic3 shows another important part which is evening it all down with a finger by just smudging it all over . This give a great base to work from for almost any eyeshadow.


Eye shadow - So a while back i saw a catwalk model with rainbow eyes and so i thought i like that im gonna try that, i found a YouTube video, which goes into great detail on how to blend the colors so im not gonna duplicate this info, i'll simply say watch the vid and you will get the above effect.
I bought a pallette of colors from Superdrug for £3 just remember to have a few clean eye applicator wands for this and keep overlaying colors till you get it how you want. I used red, orange, yellow, light green, dark green, light blue, dark blue and finally purple.
Step 7


Ok so take your eyelash comb and make sure that your curled lashes (they are still curled nicely right?) make sure they are not clumped together, you may probably want to repeat this step when you've applied your mascara if they clump together again. I dont normally need to if ive separated them at this point.
Im using a really black mascara but with these eyes you could use any vivid color for effect. Remember though we are doing a daytime look, however it doesnt mean we have to do boring makeup, we still wanna stand out right? I like Rimmel Sexy Curves cos its got a rubbery type end that never clumps and is more controllable to apply. So anyway top lashes done, bottom lashes done. A quick check to see if i've missed any lashes........ OK eyes done!


Blusher is something that some girls either get totally wrong or just right, i've seen loads of girls with huge almost red-dot like cheeks, like some kind of china doll. remember what ive been saying all along? Smudging and Layering? Start with a blush that is right for your skin tone, too dark and you will look vampy too light and you wont see it, im not saying vampy is bad but it is not appropriate for this daytime look.
Im using a cheapo Miss Sporty blush ive had for ages, i went to a makeup counter and tried a couple of colour on the back of my hand, this one is slighty pink so i can keep building layers and blending. I start with applying to my cheekbone (see pic1 above) and then i sweep almost horizontal to my ear and then diagonally downwards following the contour of my cheek (like a V shape on its side). I then keep blending and adding a bit at a time to the brush. When its done take a clean sponge and just gently smudge it all together to make it look really smoothed.

Lips - daytime look style... we all love bold lipsticks and as much as i wanted to put a bright purple lipstick on to match my top i remind myself that im going to Tesco's and not to the pub. So playing it down i use a wicked pink lip gloss by Clinique, It stays on for looooong time, i probably only have to do a touch up every couple of hours.
Thats it! All done! Time to do your hair, accessorise and get your pose on!

I hope you guys find this useful, let me know what you think here and if you do try this send me a photo and i'll put them on my site:)
Samantha
xXx